
How to Examine Anchors
Module 23
This page will focus on how to examine your natural or man-made anchor.
As per our usual theme – you MUST examine EVERY anchor. Do not assume that anything you rappel on or see will be safe. Generally, people will be okay if caution and skill are exercised.
When you get to anchor, you must always inspect it.
If you first notice many strands of webbing, it’s practice to remove it all and tie a new piece of webbing in it’s place. Many times assume that more strands equal better! Not true! In fact, it could be dangerous as the next suspecting party may assume to use it and think all is well, when it’s actually not!
When you look at the webbing, you are looking for cuts, frayed ends, sun-fading, burn marks, or stiffness. This all signifies that the webbing is old and needs replacing. Again, this is why everyone in you party needs at least 30 feet of webbing at a minimum. Sometimes double and triple that amount in canyons with many rappels.
Once the webbing check is completed, look at the knot. Is the water knot tied correctly? Is there at least 3″ of tail on both ends? Is it tied around the natural or man-made anchor correctly? If not, replace it. Do you have a “hunch” or any worry about it? Then, replace it.
There is a correct way to making sure that your anchor is equally loaded. What this means is that if one anchor (or bolt) or natural anchor fails, then your redundant or backup anchor will hold you in place. But you can’t just stretch your webbing from anything that you see. In fact, doing that may put MORE force on your anchor and have more of a chance of failing!
Look at the anchor point and make sure that you are equalizing off of a 60 degree angle or below! Anything higher than 60 degrees puts more than half the load on each anchor point, sometimes even doubling and tripling the force weight.
All of this is known as the “V-Angle“
(The following pictures used from: https://www.vdiffclimbing.com/anchors-equalize/)
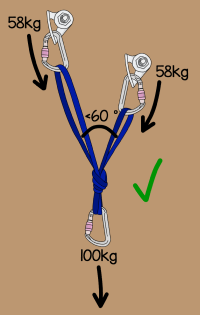
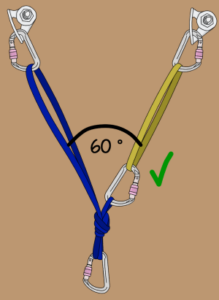
Notice how to the above two images have a “V-Angle” that is 60 degrees or less. This is ideal, because your weight of 100kg is carried on each anchor point at 58kg.
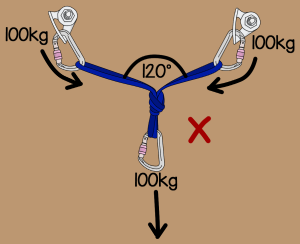
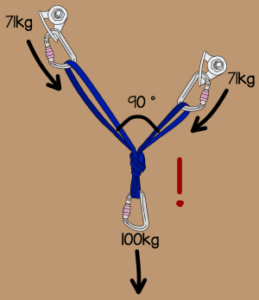
These two setups are incorrect and dangerous to utilize as the V-Angle is greater than 60 degrees!
Notice that our weight of 100kg (in the picture on the left) is now being carried by the anchors and 100kg each! And the other incorrect setup (in the picture on the right) is carried by both anchors at 71kg! Dangerous!
Last – The direction of the pull matters! This is the direction of the rappeller, as you do not want any slack in the webbing or cordelette on the anchors.

Anchor Check:
bomber? redundant? rope grooves?
Webbing:
cut, faded, burn marks, stiff?
Knot:
tied correctly?
V-angle:
less than 60 degress?
more than 60 degrees?
Equalization of Pull-Direction
when you pull the rope, are the anchor points equalized?
if not, fix the equalization by using a longer piece of webbing and/or find a new anchor point