
IN THIS MODULE
01 A COMPLETE ANCHOR INSPECTION
04 INSPECT THE ROPE-BEARING SYSTEM
23 How to Examine Anchors
This module focuses on examining natural, constructed, and fixed anchors. The theme should sound familiar by now: you MUST inspect every anchor before using it. Do not assume the previous group left you something safe—and do not let a clean-looking rappel station make the decision for you.
A COMPLETE ANCHOR INSPECTION
1
THE FEATURE — What is actually holding you? Does it move, crack, flex, rotate, crumble, or depend on something else staying perfectly positioned?
2
THE WEBBING / CORD — Inspect the full accessible length for cuts, abrasion, glazing, stiffness, severe fading, contamination, and hidden damage.
3
THE KNOT — Is it the intended knot, correctly dressed, with the tail length your group requires? Is the webbing routed where you think it is?
4
THE METAL — Inspect bolts, hangers, rings, chains, pitons, and quick links for looseness, deformation, wear grooves, burrs, cracks, and corrosion.
5
THE GEOMETRY — If multiple points are intended to share load, understand the angles and confirm that the system is actually distributing the load the way you expect.
6
DIRECTION OF PULL — Ask what happens at the edge transition, if the rappeller swings, or if the rope momentarily unloads and reloads.
7
ROPE PATH — Look for sharp edges, grooves, pinch points, moving rock, and a pull direction that could damage rock or trap the rope.
8
BACKUP / TEST / REASSESS —If doubt remains, rebuild, replace, or choose another option.
*CASE STUDY: THE FALL HAPPENED BEFORE THE RAPPEL — LYTLE CREEK, 2019
On May 27, 2019, three canyoneers descended Middle Fork Lytle Creek in California. After reaching a ledge between rappels, one member approached the next anchor through the watercourse without fall protection. She fell down the next drop. Her companions provided first aid and sought help; nearby campers supplied additional equipment and activated a satellite beacon. A helicopter evacuated her after a wait of roughly three hours. The report describes multiple fractures, blood loss, and hypothermia. She survived and was recovering when the account was written.
Lesson learned: A sound anchor cannot protect someone who falls while trying to reach it. Assess the entire approach from a protected position, including wet rock, current, exposure, and where each teammate will wait. Arrange appropriate protection before anyone enters terrain where a slip could be serious. Practice these transitions with an instructor. Once someone is injured, even a pleasant day can become a cold, prolonged wait.
Think it through: Where must protection begin if the dangerous movement occurs before the next anchor is reachable?
ADDITIONAL READING
ICAD — Lytle Creek 2019-05-27; companions' account
NATURAL ANCHORS: 4 Steps
1 | Inspect the anchor itself for weakness. Look for decay or damaged roots on trees, cracks, and fractures, loose flakes, or deteriorated rock on boulders and chockstones. |
|---|---|
2 | Look beyond the visible surface. Determine what holds the feature in place – roots and soil, buried rock, surrounding canyon walls, or the shape of a constriction. Watch for erosion, undercutting, or loose material around the base. |
3 | Consider whether the anchor could shift, rotate, roll, lift, tip, or pull free when loaded. Also make sure the sling or webbing cannot slide over or off the feature. |
4 | Visualize the actual rappel load. Make sure the direction of pull keeps the anchor stable and ethe webbing captured rather than rolling or pulling the feature toward an opening. If the anchor is questionable, choose another anchor or back it up. |
LOOK BEYOND THE SLING: The webbing may look perfect while the object under it is rotten, fractured, undercut, or unstable. The anchor is the whole “load path”—not just the colorful part you can see.
CAIRN & DEADMAN ANCHORS:
CAIRN
Look at the primary rock, the rocks reinforcing it, how the webbing is captured, whether the pile can settle or roll, and whether group movement near the anchor could disturb it.
DEADMAN
Evaluate what is known about the buried object, its orientation, the material surrounding it, evidence of erosion or excavation, and whether the load direction matches the way it was constructed.
ADVANCED JUDGMENT: The ACA specifically teaches construction, evaluation, backup, testing, and use of cairn/deadman anchors at an intermediate leadership level. Seeing one in a canyon is not the same as knowing how to evaluate one.
INSPECT THE ROPE-BEARING SYSTEM
Petzl notes that fixed anchors in canyons can become worn, corroded, weakened, or loose. The important word is system: a solid bolt does not help if the hanger is loose, the quick link is deeply worn, the sling is cut, or the surrounding rock is failing.
1 | Check the hanger orientation, bolt/nut, movement, deformation, cracking, corrosion, and the surrounding rock. |
|---|---|
2 | Inspect the rope-bearing surface. Look for deep grooves, sharp edges, burrs, cracking at welds, deformation, and a gate that is damaged or not properly closed. |
3 | Trace the load path through every component instead of assuming that two bolts automatically make the station redundant. |
4 | Where encountered, inspect movement, corrosion, deformation, rock quality, and how the hardware is actually loaded. |
PRACTICAL RULE: If doubt remains, replace or back up the anchor whenever possible. Damage can be obvious—or hidden inside the rock, behind a sling, or at the exact surface where the rope runs.
WEBBING, KNOTS & SOFT GOODS

A pile of old webbing can create a false sense of security. Inspect each strand and the portions that rub against rock.
• Inspect BOTH visible faces of the webbing wherever possible, especially where it wraps behind rock or passes through hardware.
• Look for cuts, fraying, fuzzing, glazing, severe abrasion, stiffness, chemical damage, melted areas, and portions narrowed by repeated rope pulls.
• Check the knot itself. This book uses a minimum of three inches of tail on both ends of a Water Knot; treat that as a book standard, not permission to ignore poor dressing or damaged webbing.
• Remove or replace questionable material when appropriate rather than simply adding another strand to the pile.
MORE IS NOT AUTOMATICALLY BETTER: Four pieces of unknown, sun-baked webbing do not become trustworthy just because there are four of them.
GEOMETRY, DIRECTION & THE EDGE TRANSITION
Anchor inspection is not finished until you understand how the system will be loaded. The geometry can look perfect while nobody is on rope and change dramatically when the rappeller steps over the edge.
ANCHOR ANGLE
For the equalized two-point geometry described in this book, keep the included angle at 60° or below. The wider the angle becomes, the more force each leg must carry. Do not use angle as a substitute for strong points.
DIRECTION OF PULL
Ask whether the expected load pulls down, out, sideways, or upward on any component. A feature that is stable in one direction can become unstable when the rope line changes.
EDGE TRANSITION
The first few feet may briefly unload or re-load the system as a person sits, stands, steps around a corner, or swings. Evaluate the anchor for the whole transition—not just steady hanging weight.
ROPE RETRIEVAL
Before the first rappel, look forward to the pull. Where will the pull rope run? Could it groove sandstone, lift webbing, jam behind a feature, or pull hardware into a bad orientation?
EQUALIZATION: A VISUAL LESSON
Equalization does not mean “more pieces automatically equals safer.” It means arranging a multi-point anchor so strong, independent points can share the expected load in the expected direction while limiting unnecessary movement if one point stops contributing. Equalization can improve how a good anchor system works; it cannot make a weak point strong.
The hardware and exact rigging may differ in a canyon, but the transferable inspection questions are extremely useful: Are the points actually sharing the load? Is the system aimed at the real direction of pull? Are the angles reasonable? And what happens if one point fails?
THE BASIC TWO-POINT IDEA
For a basic two-point example, start with two strong, independent anchor points and connect them with a webbing/sling loop or cordelette. Pull the center toward the expected direction of load, create a fixed central/master point, then clip that point with a locking carabiner. The sequence below shows the basic idea; the exact canyon rigging may differ with the anchor and rappel system.
1 | Start with two strong, independent, trustworthy anchor points. Equalization cannot rescue a weak bolt, rotten tree, loose boulder, damaged webbing, or bad rock. |
|---|---|
2 | Clip the webbing/sling or cordelette to both points and pull the center toward the actual direction of pull. Position the master point where the rappel will really load the system—not simply where it looks neat. |
3 | Tie a fixed central point (the supplied example uses an overhand knot), then clip a locking carabiner into the master point. Dress the system cleanly and keep the legs organized. |
4 | From a safe, backed-up position, gently preload the system in the intended direction. Both intended legs should tension. If one leg stays slack, re-adjust before anyone commits to the rappel. |
STEP-BY-STEP: BUILDING THE BASIC TWO-POINT SYSTEM
Step 1: CLIP TO BOTH POINTS & CENTER
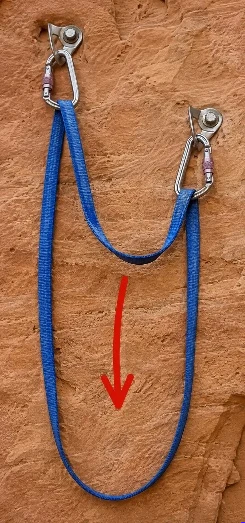
Clip the sling or cordette to both strong anchor points.
• Pull the middle down toward the expected direction of pull.
• Center the material so both intended legs can share the load.
• Do not continue if either anchor point is questionable.
Step 2: TIE & DRESS THE OVERHAND KNOT

Tie an overhand knot to create the fixed central/master point.
• Dress and snug the knot so the two loaded legs remain organized.
• Keep the master point aligned with the expected direction of pull.
• Verify both intended legs are snug before moving on.
Step 3: CLIP THE MASTER POINT
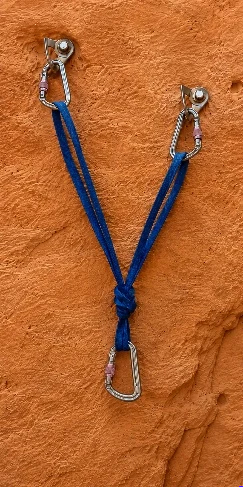
Clip a locking carabiner into the master point.
• This becomes the central connection for the rappel system.
• Keep the V-angle compact and the master point aligned with the expected pull.
THEN GENTLY PRELOAD & VERIFY
• Pull in the actual direction of the rappel path.
• Both intended legs should become tensioned.
• If one leg stays slack, adjust the central/master point.
• Equalization cannot rescue a weak anchor point.
WHY EQUALIZATION MATTERS
1 | LOAD SHARING — Are the strong, independent points actually sharing the load, or is one leg doing most of the work? | |
|---|---|---|
2 | DIRECTION OF PULL — Is the system equalized for the direction the rappel will really pull during the edge transition and descent? | |
3 | LIMITED EXTENSION — If one point fails or stops contributing, how far could the master point drop or swing before the remaining point takes the load? | |
THE INSPECTION MINDSET: Do not count anchor points. Trace the load path. Two bolts, three pieces of webbing, or four pieces of gear can still function like a one-point anchor if only one leg is actually loaded or all “independent” points depend on the same failing rock feature. | ||
THE V-ANGLE: SMALLER IS BETTER
The V-angle is the included angle between the two loaded legs just above the master point. As that angle opens, the force carried by each anchor point increases. VDiff uses three simple examples that are easy to remember:
V-ANGLE | LOAD / POINT | WHAT IT MEANS |
|---|---|---|
60° | ≈58% | Recommended angle; this book uses 60° or less as the ideal target. |
90° | ≈71% | Each point carries noticeably more than half the total load. |
120° | ≈100% | Each point can carry about the full load. Do not treat this as useful equalization. |
These percentages assume a symmetrical two-point system sharing a steady load. Actual distribution also depends on leg length, stiffness, and direction of pull. This book uses 60° or less as a conservative target when practical; it is not proof that the anchor is strong.
WHY 120° IS A RED FLAG: At about 120°, each side can carry roughly the full applied load. You still have redundancy if the points are independent and strong, but you are no longer gaining the load-sharing benefit people often assume “equalization” provides.
“V-ANGLE”: WHAT CHANGES AS THE ANGLE OPENS
60° — ≈ 58% of load, per point
90° — ≈ 71% of load, per point


120° — ≈ 100% of load, per point
NARROW THE ANGLE — RECONFIGURE AND CHECK


Wider V-angles increase tension in each leg. The lower-right illustration shows a reconfigured connection. Perspective and labels are approximate; the next plate supplies exact geometry. A green check refers to the feature shown, not the strength of the whole anchor.
ANCHOR ANGLES — THE GEOMETRY

A steady load W is shared by two symmetrical legs. Angles are exact; force figures are rounded. At 90°, a 220 lb load gives about 156 lb per leg. The fourth panel lowers the master point by lengthening both legs. These are idealized load-sharing diagrams, not complete rigging instructions.
DIRECTION OF PULL: EQUALIZED FOR WHICH WAY?
A statically equalized anchor is directional. It may share load very well when pulled straight down and poorly when pulled sideways. Build for the direction the anchor will be weighted and then test that direction. That idea matters even more in canyoneering because the pull can change as the rappeller sits back, moves around a corner, transitions over an edge, or swings onto the rappel line.
• Stand where you can see the complete rappel line. Imagine the load from the master point to the lip—not simply “down.”
• Look for a leg that goes slack as the pull moves toward the actual rappel direction.
• Ask whether a natural feature becomes less stable when loaded outward, sideways, or upward.
• Consider the last person and the rope retrieval. The rappel load direction and the pull-rope direction are not always the same.
DIRECTION OF PULL: CORRECT VS. OFF-AXIS


The hardware illustration highlights a slack leg. In the geometric comparison, the changed pull shifts the master point and leaves one leg slack. Reassess the actual load direction and the extension possible if a point fails.
SLACK, EXTENSION & SUDDEN RELOADING
Slack is easy to underestimate. A leg that is slack is not sharing the present load. If the loaded point fails, the master point can drop or swing until the slack leg catches. That movement creates a faster, more abrupt transfer of force to the surviving point than a system with little or no extension.
VDiff describes this as “shock loading”. In a canyon rappel anchor, it is more useful to think in terms of extension and sudden reloading: how far can the system move, and what will the remaining component experience when that movement stops?
DO NOT “PROVE” A MARGINAL ANCHOR BY BOUNCING ON IT: Preloading and testing should be controlled and backed up when appropriate. If the feature, webbing, or hardware is questionable, the answer is not to hit it harder until it survives. Rebuild, replace, add a competent backup, or choose another option.
CANYONEERING CONTEXT
1 | EDGE TRANSITION — The pull may change as the rappeller sits, stands, steps around a lip, or swings. Inspect the anchor for the entire transition—not just for steady hanging weight. |
|---|---|
2 | NATURAL FEATURES — A tree, chockstone, boulder, or cairn can be strong in one direction and unstable in another. Equalization does not prevent the feature itself from rolling, lifting, rotating, or uprooting. |
3 | ROPE RETRIEVAL — After the last person descends, the pull direction can change again. Ask whether the retrieval could lift webbing, drag hardware into a bad orientation, move a loose rock, groove sandstone, or trap the rope. |
4 | WATER / DEBRIS / EROSION — Canyon anchors live in an environment that changes. Flood debris can strike hardware, sand can erode away, and water can hide damage. Reinspect every visit. |
A 30-SECOND EQUALIZATION CHECK
1 | POINTS — Are the individual anchor points strong, independent, and appropriate for the expected direction of load? | |
|---|---|---|
2 | LEGS — When gently preloaded, are all intended legs tensioned? Any slack leg deserves an explanation. | |
3 | ANGLE — Is the V-angle compact? In this book, use 60° or less as the preferred beginner target when practical. | |
4 | DIRECTION — Does the system still share load when pulled toward the real rappel line and edge transition? | |
5 | EXTENSION — If one point disappears, how far can the master point move and what will it hit, swing into, or suddenly load? | |
6 | WHOLE SYSTEM — Check webbing/cord, knots, metal, natural features, rope path, retrieval path, and the backup—not just the “equalization.” | |
EQUALIZATION IS NOT MAGIC: It can distribute load among good points. It cannot turn poor rock into good rock, stop a rotten tree from failing, repair UV-damaged webbing, make loose hardware tight, or make non-independent points truly redundant. | ||
BRETT’S OPINION: If the anchor only looks “equalized” when nobody is actually pulling on it, it is not finished being inspected. Put a controlled, backed-up load on the system in the direction it will really be used and watch what every leg does. | ||
*CASE STUDY: AN ANCHOR THAT ONLY WORKED WHILE LOADED
In March 2014, a canyoneering group in Jolley Gulch in Zion National Park stopped partway through a two-stage rappel and attempted to build an anchor from a piece of 2×4 lumber wedged into a V-shaped groove in the canyon. The rappel rope was simply looped over the wood.
While the rope remained weighted/loaded, the wood stayed in position. However, when tension was removed, the piece of lumber could fall from the groove. As the rappeller negotiated an awkward edge transition, he briefly unweighted the rope. The wood fell, the anchor disappeared, and the rappeller fell approximately 30 feet, striking the canyon wall before landing below.
The canyoneer survived but suffered severe injuries, including ten broken ribs, a punctured lung, shoulder damage, and a compressed vertebra. Zion National Park Search and Rescue conducted a difficult technical evacuation and helicopter extraction.
Lesson Learned: An anchor must remain secure throughout the entire rappel—not only while it is continuously loaded. Consider what will happen if the load changes direction, becomes lighter, or disappears completely.
Source: National Park Service. “Canyoneer Injured in Jolley Gulch.” Zion National Park, March 13, 2014.
National Park Service — Jolley Gulch unstable 2×4 anchor, 2014
WHY THIS MATTERS: An anchor does not only need to survive steady body weight. It needs to remain strong and reliable through the entire sequence of loading, unloading, edge transition, movement, and rope retrieval that your group will create.
*CASE STUDY: TWO PEOPLE DESCENDED BEFORE THE ANCHOR FAILED — SIERRA CANYON, 2021
On December 30, 2021, three canyoneers used a rock arch outside Sierra Canyon's watercourse to avoid a pool. According to the participant account published by ICAD, two people descended successfully. The arch broke as the third passed the lip. He fell approximately 25 feet and later died from his injuries.
Lesson Learned: Earlier successful descents do not certify an anchor. Assess the rock itself, loading direction, placement, and any changes before every person descends. A route chosen to avoid getting wet can introduce a greater fall hazard. Testing and a gentle start add information; neither can make unsound rock reliable.
Think it through: What extra risk does this dry bypass introduce?
ADDITIONAL READING
• Petzl — “Building a belay anchor and belaying on a bolted multi-pitch route.”
• Petzl — “Inspection of anchors on rock, ice or mixed routes.”
• VDiff Climbing — “Trad Anchors: Equalizing Gear.”
National Park Service — “Canyoneer Injured in Jolley Gulch” (Zion National Park, March 13, 2014).