
IN THIS MODULE
02 WHAT A GOOD RAPPEL SHOULD FEEL LIKE
03 38-STEP VISUAL RAPPELLING SEQUENCE
04 RAPPELLING QUICK REFERENCE — 13 STEPS
27 Intro to Rappelling
There are many descender devices on the market, so read the manual for the device you actually own. The rope path, friction options, lock-off methods, and limitations can vary. Before your first real rappel, practice with an experienced person in a controlled setting.
DO THIS BEFORE THE CANYON: Your first technical canyon should not be the first time you have ever rappelled. Learn the device, the brake hand, the edge transition, and how to stop before the consequences are real.
BEFORE YOU START
• Verify that the rope reaches the intended safe endpoint. If the landing is hidden, stop for a trained leader's length-setting, end-management, communication, and rescue plan; a guess based on the beta is not confirmation.
• Think about rappel height, your body weight, and the weight of your pack.
• Use the friction setting appropriate for your device, your weight, and the rappel.
• Remove unnecessary slack between your device and the anchor before you commit to the edge.
• Keep hair, clothing, straps, and loose gear away from the descender.
BRAKE HAND: Keep control of your brake hand throughout the rappel. This is literally your life line.
WHAT A GOOD RAPPEL SHOULD FEEL LIKE
The edge transition often feels awkward at first. That is normal. The goal is not to “climb down” the wall. Lean back, put your feet on the wall, and let the rope and descender support you while your brake hand controls the descent.
TECHNIQUE REMINDERS
• Stay as perpendicular to the wall as the terrain allows.
• Keep the brake hand near the side of your waist.
• Walk backward with controlled steps.
• Avoid bouncing or jumping on the rope.
• Avoid swinging side-to-side like a pendulum.
PRACTICE SKILLS
• Add friction while on rappel with your specific device.
• Practice stopping and locking off.
• Try a controlled “sit start” when an edge transition feels intimidating.
• Practice at a comfortable pace under supervision.
ABOUT GLOVES: Tom Jones has said that gloves can protect your hands from heat and abrasion, but they should not hide poor friction control. Learn to manage your friction settings without gloves first.
And one reminder I agree with completely: rappelling is fun, but it is not the entire reason to canyoneer. It is one skill inside a much bigger sport.
38-STEP VISUAL RAPPELLING SEQUENCE
The following pages is a visual walkthrough of the steps of rappelling.
HOW TO USE THIS: Flip through the sequence in order. Pay special attention to the anchor setup, slack removal, body position, overhang transition, and what happens to the descender at the bottom.

STEP 01
Harness on.

STEP 02
Helmet on.

STEP 03
Attach PAS to Harness.

STEP 04
Attach PAS using the manufacturer-approved harness attachment point(s).
Depending on the PAS and harness, this may be the belay loop or the designated tie-in points.

STEP 05
Attach a Carabiner to the end of the PAS.

STEP 06
Clip the loose PAS end to a gear loop for storage only. A gear loop is not a life-support attachment point.
Tighten up slack on PAS. You can do this by having the carabiner go through the middle point of the PAS too.

STEP 07
Attach the descender with its compatible locking connector to the harness's designated rappel attachment, following both manufacturers' instructions. The complete connection must be visible and checked before use.

STEP 08
Attach 3x carabiners to gear loop on harness.

STEP 09
Locate anchors at rappel (if any).

STEP 10
1st thing – "clip in" via your PAS to the anchor (so you don't slip off the wall while you are setting up the rappel!)

STEP 11
PAS in this picture is clipped into the chains.

STEP 12
Get rappel ready. Bring rappel rope close to anchor.

STEP 13
Thread rappel rope through quick link (or what is appropriate for your rappel station and anchor).

STEP 14
Check that the landing zone is clear, alert anyone below, and wait for acknowledgment where possible. Then deploy the rope or rope bag under control; avoid striking people or dislodging rock.

STEP 15
Setup your rappelling knot (it depends for each rappel, your group situation/dynamics, if there is a water flow, etc. ).

STEP 16
Thread rope through your rappel device.

STEP 17
See the slack from the rappel device to the anchor?

STEP 18
Remove slack. While still secured by the PAS, check the rope path, harness attachment, friction setting, and locked carabiner. Gently weight the descender with your brake hand controlling the rope and verify that the system supports you.

STEP 19
Only after the complete check and supported weight-test, remove the PAS from the anchor while maintaining brake-hand control.

STEP 20
Get feet firmly planted on rock wall.

STEP 21
Legs should be perpendicular to wall; keep brake-hand (right hand, if you are right-handed; left hand, if you are left-handed, typically) by waist.

STEP 22
Walk backwards down the wall, maintaining good friction control with your brake hand.

STEP 23
(Angle from the bottom looking up at the rappeller).

STEP 24
Good technique here; It should "look" this way when you (or someone else) are rappelling.

STEP 25
!!Bad technique being demonstrated here!! Don't try to climb-down – Rappel! And Rappel with your legs out. It's much easier and less scary than you might think.

STEP 26
Similar as before, not good technique, but it is slightly better. Can you see the difference between both photos? You want to become nearly perpendicular with the wall; not like the previous photo.

STEP 27
At an overhang, first, plant your feet right at edge, while staying perpendicular.

STEP 28
While feet are still on ledge, lower your rear end then continue to LOWER than your legs only.

STEP 29
Rear end is nearly at the stretch point for Sarah.
Good technique for safely rappelling an overhang.

STEP 30
When you can't lower rear end anymore, drag feet off of cliff edge until you swing towards the wall.

STEP 31
Lowering your hips before your feet leave the lip can reduce the swing. Keep your helmet, face, and hands clear of the rock and stay in brake-hand control; the technique cannot guarantee that you will avoid contact.

STEP 32
Sarah is now ready to rappel again, and with hair, fingers, and gear away from rock wall.

STEP 33
Sarah continuing with the rappel.

STEP 34
Nearly at the bottom of the rappel!
STEP 35
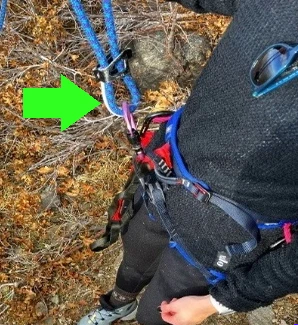
Reached the bottom! Rope and descender device STILL attached at bottom of rappel.

STEP 36
Depending on your rappel device, you may remove the rope from the device while the descender device is STILL attached to your harness. This is good practice and a standard, as it minimizes dropping the device in water or a water-filled pothole, where it may be impossible to retrieve!

STEP 37
Rope almost removed from descender device.

STEP 38
Rope is now separated completely. Descender device still attached to harness.
All done! Nicely done Sarah!
RAPPELLING QUICK REFERENCE — 13 STEPS
1. Secure Your PAS — Clip your Personal Anchor System to the anchor before you start working at the edge.
2. Set Up the Rope — Prepare the rappel rope and the rigging method your group has chosen.
3. Drop the Rope — Stay clipped in while the rope or rope bag goes over the edge.
4. Check the Rope — Confirm the rope reaches the bottom or matches the group's established plan.
5. Verify the Knot / Rigging — Inspect the system before anyone commits to it.
6. Thread the Rope — Load your descender according to the device manufacturer and the group plan.
7. Remove Slack & Test — While still tethered, check the full rope path and locked connector, then gently weight-test the descender with your brake hand in control.
8. Detach Your PAS — Unclip only after the checked rappel system supports you and your brake hand controls the rope.
9. Maintain Your Brake Hand — Keep the brake hand in control throughout the descent.
10. Position Yourself — Plant your feet, lean back, and establish a stable rappel stance.
11. Begin Rappelling — Walk backward down the wall with controlled rope movement.
12. Monitor Friction — Use the friction options of your specific descender as needed during the rappel.
13. Land & Clear the Rope — At the bottom, keep the descender attached to your harness when possible while removing the rope so you are less likely to drop the device.
PRACTICE FIRST: A printed sequence can remind you of the order. It cannot watch your brake hand, correct your device, or stop you from making a bad edge transition. Practice with someone qualified before doing this in a canyon.
EMERGENCY RAPPEL HARNESS/SEAT using WEBBING
A damaged or forgotten harness should change the plan immediately. If a safe retreat is available, use it. But when retreat is not practical and a controlled life-safety descent is truly necessary, a properly constructed improvised webbing seat can provide an emergency option for a trained team.
THE IMPORTANT TERMINOLOGY: “Swiss seat” is often used as a catch-all term, but military references commonly use the name for a rappel seat tied from rope. Fire-rescue references describe the webbing version as a hasty harness or modified diaper. In this book, “emergency rappel seat” means the webbing version shown here.
This is not a replacement for a properly fitted, certified canyoneering or climbing harness. It is an emergency technique that should be learned and practiced before the canyon — not improvised for the first time while standing at an exposed rappel.
WHEN IT MAKES SENSE — AND WHEN IT DOES NOT
REASONABLE EMERGENCY USE
A harness is damaged, lost, or unavailable; the group cannot safely retreat; and a controlled single-person descent is required.
NOT A NORMAL HARNESS
Do not plan to use it for routine canyon travel, long suspension, repeated rappels, lead climbing, dynamic falls, or as an excuse to enter without proper equipment.
WHAT YOU NEED
• Approximately 12–15 ft (3.7–4.6 m) of 1-inch life-safety/climbing webbing. A rescue hasty-harness reference uses these lengths depending on body size.
• A correctly tied and dressed Water Knot to make the webbing into one continuous loop.
• A locking carabiner large enough to capture both front bights without crowding or cross-loading.
• Your normal helmet, rappel device, gloves, rope system, and a competent partner to perform the final check.
MATERIAL MATTERS: Use climbing/rescue webbing intended for life-safety applications — not luggage straps, hardware-store webbing, paracord, or unknown material. Raw webbing strength alone does not make the improvised harness safe; fit, knot security, connection, and body position matter too.
HOW TO BUILD THE EMERGENCY WEBBING SEAT — STEPS 1–3
The sequence below follows the basic webbing hasty-harness construction used in fire-rescue training. Practice it on level ground first. The photo boxes are intentionally set up as a shot list so you can replace them with your own step-by-step photos for the final book.
PHOTO 1
Show the Water Knot close-up and the complete loop laid out on the ground.
STEP 01
Make One Continuous Loop
Join the two ends of the webbing with a Water Knot. Dress and set the knot carefully. Both tails should remain clearly visible and the webbing should lie flat rather than twisted.
PHOTO 2
Rear 3/4 view showing the knot at the lower back and the webbing hanging evenly.
STEP 02
Start Behind the Waist
Place the large loop behind you with the Water Knot centered at, or very near, the small of your back. Hold one side of the loop in each hand.
PHOTO 3
Front view: hands reaching between the legs to capture the two rear strands.
STEP 03
Reach Between the Legs
As the loop comes around the waist, reach between your legs from the front and grab one strand of the webbing loop on each side behind you. Pull those two strands forward.
DON’T RUSH THE SHAPE: The goal is not merely to get webbing around your body. The finished geometry must capture the waist and both legs. Twists, missed strands, or an incorrectly captured bight can create a system that looks “close enough” but is not the same harness.
HOW TO BUILD THE EMERGENCY WEBBING SEAT — STEPS 4–5
PHOTO 4
Front view showing both bights pulled through before the carabiner is attached.
STEP 04
Pull Two Front Bights Through
Pull a bight of webbing forward on each side and through the waist strands your arms are under. As the two bights are tensioned, the webbing forms a large lark’s-foot-like capture around the waist and each leg.
PHOTO 5
Close-up of both bights inside one locked carabiner; show the gate and spine clearly.
STEP 05
Capture Both Bights
Clip a locking carabiner through BOTH front bights. Lock the gate and orient the carabiner so the expected load is along its major axis. These captured bights become the front attachment point.
FIT IT BEFORE YOU TRUST IT
• Waist section sits high and snug enough that the harness cannot simply slide over the hips.
• Leg sections support under the upper thighs / seat rather than cutting directly into the groin.
• No webbing is twisted, folded into a hard edge, or routed differently left-to-right.
• The Water Knot is dressed, set, visible, and not positioned where the front carabiner or rappel device will grind against it.
• Both front bights are fully captured by the locking carabiner; the carabiner is locked and not cross-loaded.
BODY POSITION MATTERS: An improvised seat harness does not provide the same torso control or inversion resistance as a full-body system. If the person is injured, unconscious, unusually top-heavy, unable to maintain an upright position, or otherwise at meaningful inversion risk, do not rely on the seat alone. Rescue doctrine commonly adds chest/upper-body support for high-angle work.
BEFORE ANYONE GOES OVER THE EDGE
Treat the first loading as a test, not the start of the rappel. Stay in a protected position, keep a backup in place, and load the seat gradually while another person watches the entire system.
THE 8-POINT BUDDY CHECK
1. Webbing is known life-safety/climbing material and has no cuts, burns, chemical damage, or severe abrasion.
2. Water Knot is correctly tied, dressed, set, and has obvious usable tails.
3. Waist wrap is high and snug; it cannot slip easily down over the hips.
4. Both leg captures are present, symmetrical, and supporting the seat rather than the groin.
5. Both front bights are inside the locking carabiner.
6. Carabiner is locked, oriented on the major axis, and not being forced sideways by the webbing.
7. Rappel device and rope are correctly installed for the actual rope diameter and planned descent.
8. A low, controlled sit-test has been completed and nothing migrated, loosened, or became intolerably painful.
BRETT’S OPINION: A Swiss seat / hasty harness is not the Plan B you “figure out” while hanging at an anchor. It is a Plan B you practice somewhere boring until the sequence is familiar. If you ever need it for real, boring is exactly what you want.
PRACTICE PROGRESSION
• Tie it several times on the ground until you can identify the correct geometry without referring to a picture.
• Have a knowledgeable partner inspect it and deliberately show you common mis-riggings.
• Perform your first weighted tests only in a controlled training environment with a redundant backup.
• Only after repeated successful practice should it be considered part of your emergency canyon skill set.
*CASE STUDY: HANGING UPSIDE DOWN ON PINE CREEK’S FINAL RAPPEL — 2010
On April 30, 2010, Zion dispatch received a report of a canyoneer in distress on Pine Creek’s final 90-foot free-hanging rappel. NPS reported that the 40-year-old man had lost control, was hanging upside down about 80 feet above the ground and had nearly slipped completely out of his harness! He had wrapped the rappel rope around his body and was becoming too weak to keep holding on.
Rangers lowered two rescuers from a Zion–Mount Carmel Tunnel window, secured the man with webbing, and raised him to safety. NPS later recognized two of the rescuers with Department of the Interior Valor Awards.
Lesson Learned: Rappelling is not simply “clip in and go.” Harness fit, body position, friction, control, backups, and the ability to stop and solve a problem all matter—especially on a free-hanging rappel where you cannot simply stand on the wall and reset.
ADDITIONAL READING:
Source: National Park Service — “Two Zion National Park Rangers Receive Valor Awards” (Zion National Park, May 8, 2014).